Choosing what appears in the menu
The sidebar can be tailored. Each person decides which categories and entries they want to see, and an administrator sets what each role starts with — and, where it matters, what nobody may change.
This helps when the same menu serves people with very different work. A company that organises by department rather than by team can take Team Management out of the way; someone who never records expenses can hide that entry without affecting anyone else.
Hiding an entry changes only what you see. It grants and removes no access: what you are permitted to open is still decided by your role and by the modules your company holds.
Your own menu
Your own choices are made on the Navigation tab of your profile. Every category you are permitted to see is listed there, with its entries beneath it.
How to choose what appears in your menu
- Select your name at the foot of the sidebar to open My Profile.
- Select the Navigation tab.
- Clear the categories and entries you do not need, or tick the ones you want back.
- Select Save.
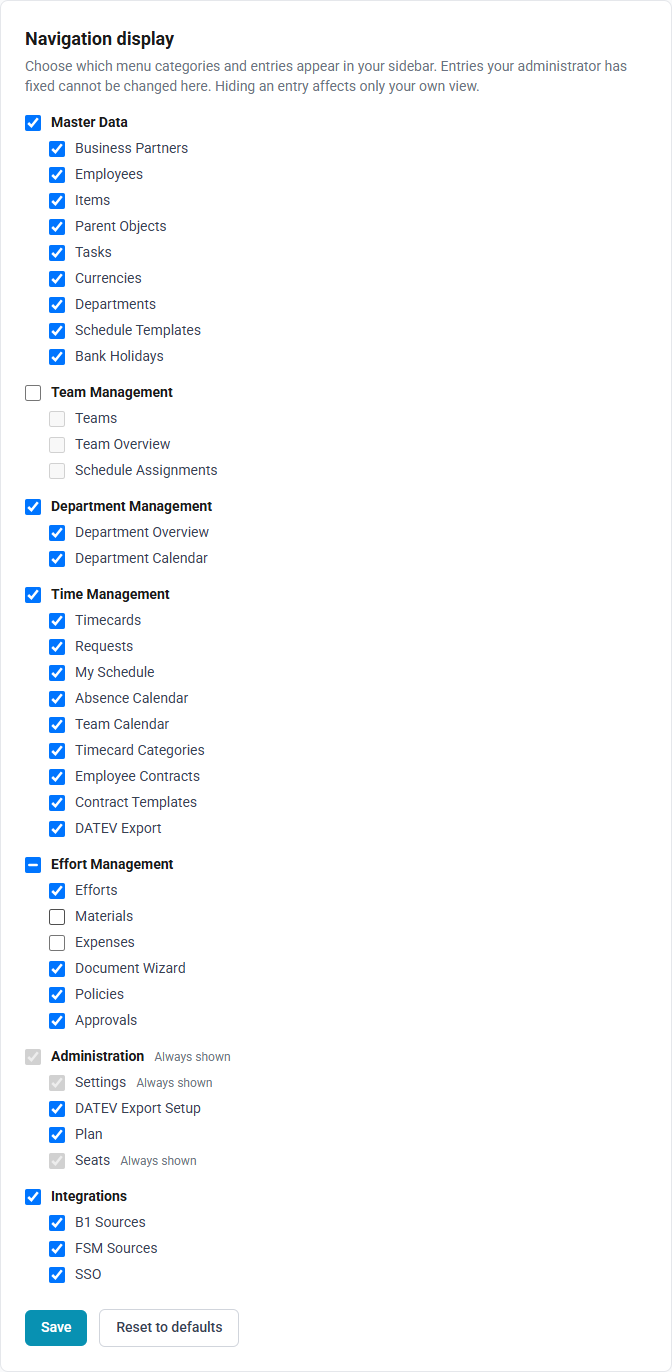
- Clearing a category removes it and everything inside it, and clears the entries beneath it so the list shows what your sidebar will look like. Ticking it again brings them all back — including any single entry you had cleared inside it beforehand.
- A category with only some of its entries showing appears with a dash rather than a tick. Selecting it once shows everything inside it; selecting it again hides the category entirely.
- Reset to defaults returns your menu to whatever your role currently starts with, discarding all of your own choices at once.
How to return to your role's defaults
- Open My Profile and select the Navigation tab.
- Select Reset to defaults.
Two kinds of entry cannot be changed, and both say why beside them:
- Always shown — entries the product needs to keep reachable, such as Administration and Settings.
- Set by your administrator — an entry your administrator has fixed for your role. It stays as they left it, whether that means always visible or always hidden.
Only your own view changes. Nobody else's sidebar is affected, and your choices follow your account rather than the device you are using.
An entry you have hidden for yourself still opens if you follow a direct link to it — from an email or a notification, for instance. Only an entry your administrator has hidden becomes unreachable.
Defaults for a role — administrators
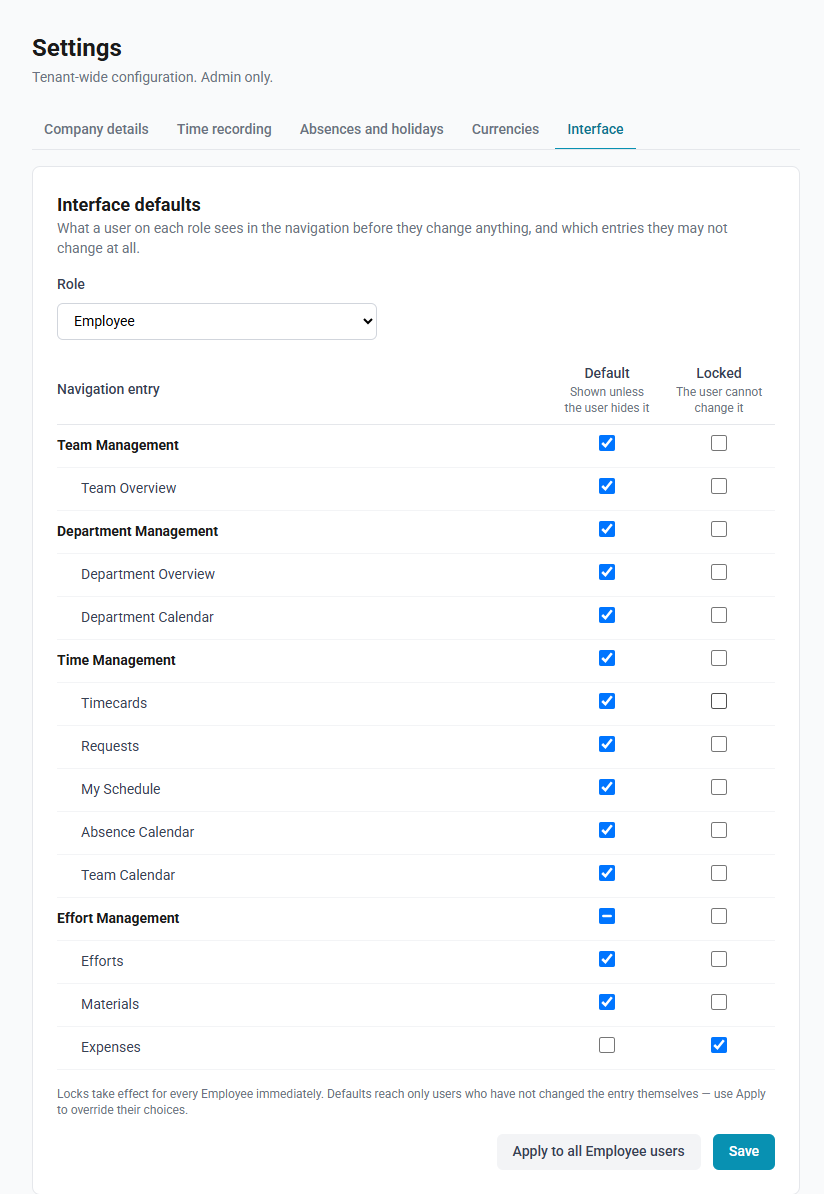
Each role's defaults are set on the Interface tab of Administration → Settings. Each navigation entry has two switches:
- Default — whether a user on that role sees the entry before they change anything. They can still change it themselves.
- Locked — whether they may change it at all. A locked entry stays exactly as you set it: locked and ticked makes it mandatory, locked and cleared puts it out of reach.
How to set the defaults for a role
- Open Administration → Settings.
- Select the Interface tab.
- Choose the Role.
- Tick or clear Default and Locked for each entry.
- Select Save.
What reaches existing users, and when
The two switches do not behave the same way, and the difference is worth knowing before you save:
- A lock applies to everyone on that role immediately. A lock always wins over a personal choice, so it takes effect the moment it is saved.
- A default reaches only the people who have not changed that entry themselves. Anyone who has made their own choice keeps it.
That second point is what Apply to all role users is for.
Applying defaults to everyone
The Apply to all role users button discards the personal choices of everyone on that role, for the entries listed on the page, and returns their sidebars to the defaults you have set. You are asked to confirm first, and afterwards the page reports how many people were affected.
Everyone whose menu actually changes receives a notification telling them an administrator has updated the navigation display for their role. They see it in the bell and on their Notifications page, and it arrives even if they have muted every other kind of notification — it concerns their own account rather than something they subscribed to. Their Navigation tab also shows the date their role's defaults last changed.
People whose menu did not change are not notified, and personal choices about entries outside the list are left alone.
How to apply a role's defaults to everyone on it
- Open Administration → Settings and select the Interface tab.
- Choose the Role.
- Select Apply to all role users.
- Select Apply defaults to confirm.
What you cannot do here
- Grant or remove access. Showing an entry cannot reveal a page your role or your company's modules do not permit. The configurator only ever removes from what you are already allowed to see.
- Configure one named person. Defaults and locks apply to a whole role.
- Reorder the menu. Only visibility can be set; the order is fixed.
- Change someone else's own choices individually. The only way to override them is Apply to all role users, which is deliberately an all-at-once action with a confirmation and a notification.