Your profile
My Profile holds your own settings: your name, how you sign in, your balances, your calendar subscription, your timecard presets, and what you are notified about. Open it by selecting your name at the foot of the sidebar. Every change here affects only you.
The page has seven tabs: Identity, Sign-in, Absences, Timecards, Notifications, Navigation and Dashboard.
Identity
Shows your Code, Email and Role, which an administrator sets, and your Name, which you may change.
How to change your name
- Open the Identity tab.
- Enter the new Name.
- Select Save.
Sign-in
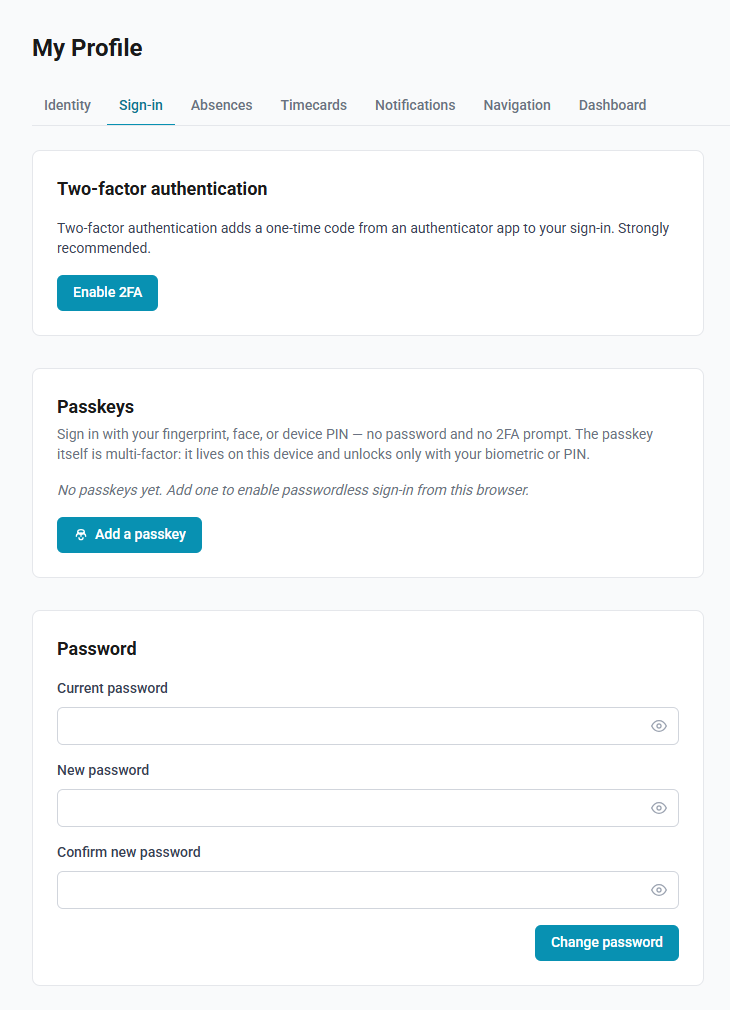
Two-factor authentication
Shows whether two-factor authentication is on, and since when. For what it does and how to enable it, see Signing in. Without a ChronoHub password, you sign in through single sign-on or a passkey, which never ask for the code, and the section says so instead of offering it.
How to turn two-factor authentication off
- Open the Sign-in tab and select Disable 2FA.
- Enter your Current password. Accounts that sign in only through single sign-on are not asked for one.
- Enter the Current 2FA code from your authenticator app. Without the app, select Use a recovery code instead, and enter a recovery code.
- Select Disable 2FA.
Turning it off also forgets every trusted device, and makes your recovery codes invalid.
Recovery codes
Shown while two-factor authentication is on: how many of your recovery codes are unused. Each one signs you in once without your authenticator app; see Signing in.
How to generate new recovery codes
- Open the Sign-in tab and select Generate new recovery codes.
- Enter the Current 2FA code from your authenticator app.
- Select Generate.
- Store the codes shown, with Copy or Download, and select I have stored the codes.
The new codes replace all earlier ones, which stop working. ChronoHub sends you an email to say new codes were generated.
Passkeys
A passkey signs you in with your fingerprint, face or device PIN, without a password or a two-factor code. It belongs to the device on which you create it. The list shows each passkey with the date it was Added and when it was Last used; Remove deletes it.
How to add a passkey
- Open the Sign-in tab on the device you want to sign in with.
- Under Passkeys, select Add a passkey.
- Follow your browser's or device's prompt.
Trusted devices
Shown while two-factor authentication is on. Each browser that completes the two-factor step is trusted for 30 days, and signing in there asks only for your password. The list shows when each was Last used and when it Expires.
- Forget removes one device; it asks for a code at its next sign-in.
- Forget all devices removes them all, after a confirmation.
Password
Shown only for accounts that have a password, so not for accounts that sign in only through single sign-on.
How to change your password
- Open the Sign-in tab.
- Enter your Current password.
- Enter the New password, of at least six characters, and enter it again under Confirm new password.
- Select Change password.
Absences
| Section | Shown when | What it shows |
|---|---|---|
| Flex (hour bank) | Your hour bank has activity, or a cap applies | Current balance, what happens to it at year end, Total accrued and how much was used, the Cap, and Recent activity. See Flex and opening balances |
| Balances | You have an allowance this year | For each allowance: hours used, including pending requests, of the year's total, and what remains |
| Approval delegations | Your role is Administrator, Manager or HR | Your delegations, past and coming |
| Calendar subscription | Always | Your private calendar feed |
Approval delegations
While you are away, a delegation sends approval requests meant for you to someone else. The delegate must be an administrator, a manager or HR. If your delegate has delegated too, ChronoHub follows the chain up to three steps; beyond that, the request stays with you.
How to delegate your approvals
- Open the Absences tab.
- Under Approval delegations, choose the person under Delegate to.
- Enter the Start date and the End date.
- Select Add.
To end a delegation early, select Delete beside it.
Calendar subscription
The subscription is a private web address that calendar applications read from. It contains your approved requests: absences, shown as busy, and requested work days, such as remote work, shown as free. Each appears over its dates, named by its category and your name, with your note as its description. New approvals appear when your calendar next refreshes.
Treat the address as a password: anyone who has it can read the feed.
How to subscribe your calendar
- Open the Absences tab.
- Under Calendar subscription, select Generate subscription link.
- Select Copy beside the Subscription URL.
- Add it to your calendar application:
- Outlook: Calendar → Add calendar → Subscribe from web, then paste the address.
- Apple Calendar: File → New Calendar Subscription, then paste the address.
- Google Calendar: Other calendars → From URL, then paste the address.
Generate a new URL replaces the address at once; calendars subscribed to the old one stop updating until you give them the new one. Revoke removes the address after a confirmation. Either way, a calendar keeps the events it had already received.
Timecards
Quick-log templates are your own timecard presets. They appear as buttons on the Record today card of your home page: your default template as the main button, the others beneath it under Other templates. See The home page.
How to add a template
- Open the Timecards tab and select Add template.
- Enter a Name, unique among your templates.
- Choose the Category.
- Enter the Start time, the End time, and if needed the Break (HH:MM) and Remarks.
- To make it the main button, tick Use this as my default template.
- Select Save.
You have at most one default; making a template the default, here or with Set default in the list, takes the mark from the previous one. The arrows beside each template move it up or down, which sets the order of the buttons. Categories whose days require a request are not offered, except to administrators and HR.
Notifications, Navigation and Dashboard
- Notifications: for decisions on your efforts and for each kind of request, whether you are told in ChronoHub (In-app) and by Email. Both are on until you clear them; each change saves at once. See Notifications.
- Navigation: which menu entries appear in your sidebar. See Choosing what appears in the menu.
- Dashboard: how far ahead the absence cards on your home page look. See Choosing how far ahead the absence cards look.